
Way back in March, my father and I planted three tomato plants in my backyard. Now, after spending a couple of weeks eating tomatoes that were not exactly 'ripe' but far too tempting to pass up, I am flush with ripe, gorgeous home-grown tomatoes.

I wanted to do something 'fancy' with them, and I thought a savory tart would be just the thing.
Now, I have never made a savory tart before, so this was an adventure. But, I'm tired of being afraid of pastry crust, and since there was no pressure, as I was making it just for my own enjoyment, I felt courageous.
And let me tell you...

... this is hands down one of the best things I have ever made.
There is a secret layer of Dijon mustard on the bottom, which is absolutely perfect. I used goat cheese and thyme to also accompany the tomatoes, and I was, in particular, shocked at how perfect the thyme was. And add to the mix
perfect tomatoes...

and you're in for a summer treat.
Start with your tomatoes. One worry was that the tomatoes were going to make the crust soggy, so I took a tip from the Oliver, and salted the tomatoes for about 15-20 minutes before hand. You just slice them up and put them in a colander.

Sprinkle with salt, and let sit for 15-20 minutes. This will cause the excess liquid to drain away and intensify the flavor.

Next, tart dough. This is a pretty easy, pretty forgiving tart dough. Start with your flour and salt in a bowl. Add the butter.
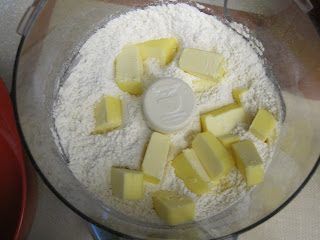
Then pulse 10-15 times until the mixture looks crumbly and feels like cornmeal.

Mix together 1 egg and 2 tablespoons of ice water, and pour it into a well in the dry ingredients.

Mix, until the dough holds together. If it doesn't come together easy, as mine didn't, add another tablespoon of ice water.

Gather the dough into a ball, and put it on a lightly floured surface.

Roll out the dough so it is large enough to cover the bottom of the pan and go up the sides.

Roll the dough over the pin, and unroll it into the pan. Gently nudge the dough, being careful not to stretch it. And, press the dough firmly into the indentations.

Cut off the excess dough, and save for a mini-tart later!

Now... time for the Dijon. It really makes such a difference.

Spread a good layer of Dijon over the bottom. And let it dry out a couple of minutes.

Arrange the tomatoes over the mustard. Try to make it pretty. And, drizzle olive oil over top.

Now for the fresh herbs.

Like I said, the thyme was just right.

Next... goat cheese.

Arrange the goat cheese on top. And, sprinkle with more herbs.

Now, the recipe says if you want, you can drizzle honey over it. So I did on half of it, just to see. Unfortunately, I forgot which half I did it on, and at the end, I couldn't actually detect a difference in flavor between either side. I think my honey was too whimpy.

Bake for 30 minutes or so, until the dough is cooked and the cheese is nicely browned.

How completely gorgeous is this?

And it tastes just as good.
 French Tomato Tart
 (from
David Lebowitz)
One 9-10 inch tart pan
Ingredients:
One unbaked tart dough (recipe to follow)
Dijon or whole-grain mustard
2-3 large ripe tomatoes (or 6-7 small tomatoes)*
2 tablespoons olive oil
salt and freshly ground black pepper
2 tablespoons freshly chopped herbs, such as thyme, chives, chervil, or tarragon
8 ounces fresh or slightly aged goat cheese, sliced into rounds**
Optional: 1 1/2 tablespoons flavorful honey
Tart Dough:
1 1/2 cups (210 g) flour
4 1/2 ounces (125g) unsalted butter, chilled, cut into cubes***
1/2 tsp salt
1 large egg
2-3 tablespoons iced water
Directions:
Preheat oven to 425.
Slice tomatoes and set in a colander. Sprinkle with salt, and let excess liquid drain for 15-20 minutes.****
For the dough*****:
Mix the flour and salt in the bowl of your food processor. Add the butter, and pulse 10-15 times, or until the mixture has a crumbly, cornmeal-like texture.
Mix the egg with 2 tablespoons of water. Make a well in the center of the dry ingredients and add the beaten egg mixture, stirring the mixture until the dough holds together. If its not coming together easily, add the additional tablespoon of ice water.
Gather the dough into a ball and roll it our on a lightly floured surface, adding addition flour only as necessary to keep the dough from sticking to the counter.
Once the dough is large enough so that it will cover the bottom of the pan and go up the sides, roll the dough around the rolling pin, then unroll it over the tart pan. "Dock" the bottom of the pastry firmly with your fingertips a few times, pressing in to make indentations.
For tart:
Sread an even layer of mustard over the bottom (the amount you would put on a sandwich) and let sit a few minutes to dry out.
Arrange tomatoes in a single, even layer. Drizzle the olive oil over top.
Sprinkle with fresh chopped herbs, then arrange slices of goat cheese on top. Add some more fresh herbs, then drizzle with honey, if using.
Bake the tart for 30 minutes or so, until the dough is cooked, the tomatoes are tender, and the cheese on top is nicely browned.
*This is what it took me
**You could use any good melting cheese you like, comte, fontina, etc.
***I think this about 9 tablespoons
****This isn't in Lebowitz's recipe, but it prevents the crust from getting soggy. In fact, when I had the tart the next day, it still wasn't soggy. So, I think this method is pretty effective.
*****I chose to do the first parts of the dough in the food processor, but you could do it by hand, cutting in the butter with a pastry blender or fork if you like.
 This gratin knocked my socks off. In no small part, I'm sure, due to the zucchini I picked from father's garden just hours before... but still, this is one to remember.
 To make this, start with zucchini or squash, or a combination (which adds such lovely color).
 Chop them up into 1/4 inch slices.
 Saute for 10 minutes.
 Add some flour and nutmeg.
 Add some hot milk.
 And, instantly: you have a beschamel on your hands.
 Cover with a mixture of breadcrumbs and Gruyere (or any other good melting cheese).
 Dot with butter.
 Pop in the oven for about 20 minutes, until golden brown.
 Then... dish it up.
 And, don't worry if you cannot restrain yourself from eating it all. I couldn't.


