 Baking is challenging. Some might even say stressful. And when you find yourself cutting cinnamon roll dough before the second rise and saying out-loud with much despair, "I've ruined everything", you might even say baking can be downright panic-inducing.
But, you know what else is true about baking? When you are lost in a bite of a warm, melt-in-your mouth, make you 'mmm' out-loud cream-cheese glazed cinnamon roll that you made, who has time for anxiety?
So, here's my inaugural run at cinnamon rolls.
 The process was a touch bumpy, but the results were completely wonderful. Which, let's be honest, is just how it sometimes goes.
You start by creaming together room temperature butter, salt, and sugar.
 Add in an egg and some lemon zest. Come on, how brilliant is the lemon zest?
 Beat.
Beat. Now, time for the other ingredients: flour, yeast, and buttermilk.
 Mix that all up until it forms a ball.
 Get the dough on your work surface.
 Now time for a work-out: knead the dough for 12 minutes if you are strong, and more like 15 minutes if you are like me. Do this until the dough is silky and tacky, it is 77-81 degrees, and passes the window-pane test.
 Now get it into a lightly oiled bowl and cover with cling wrap.
 Let it rise for 2 hours, or until it is doubled in size.
 In the meantime, mix together your cinnamon and sugar. So so delicious.
 Now, transfer the dough to your work surface,
 and roll out into a 14x12 inch rectangle(-like sort of thing).
 Sprinkle with cinnamon sugar.
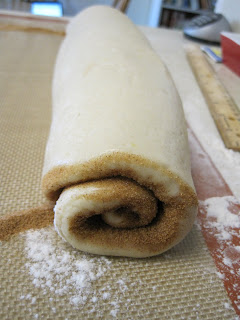
 Now, roll it up.
 I'm not sure I rolled it tight enough, but that is something I can worry about next time. For now, look at the lovely swirl!
 With the seam down, cut into 1 3/4 inch buns. This was the point I panicked. So, listen, do not worry if the buns get a bit squashed when you cut them. It will all work out.
 And let rise for 75-90 minutes, or until doubled in size and some of them have grown into each other.
 (And, yes, I realize they aren't exactly cut evenly.)
Bake in the oven for 20-30 minutes. Try not to eat the air while they are baking.
In the meantime, make your glaze. I have a penchant for cream cheese glaze, so that is what I made. Super easy, just beat together room temperature cream cheese, butter, vanilla, and powdered sugar.


Once they are golden, or you cannot wait any longer, take them out of the oven. And marvel.
 Let them cool for about 10 minutes on the pan. And feel free to continue to marvel.
 Remove to a wire rack and get ready to glaze.
 Spread the glaze evenly over the top of the warm cinnamon roll.
 While the book says after you do this you are to wait at least 20 minutes, I say posh. Eat them while they are warm.
 I mean, come on, how could you possibly resist?
 Get ready to have all your cares melt away.
Cinnamon Buns (from The Bread Baker's Apprentice)
Ingredients:
6 1/2 Tablespoons (3.25 ounces) granulated sugar
1 teaspoon (.25 ounce) salt
5 1/2 Tablespoons (2.75 ounces) shortening or unsalted butter, at room temperature
1 large egg, slightly beaten*
1 teaspoon (.17 ounce) lemon extract or 1 teaspoon (.1 ounce) grated zest of one lemon
3 1/2 cups (16 ounces) unbleached bread or all-purpose flour
2 teaspoons (.22 ounce) instant yeast**
1 1/8 to 1 1/2 cups (9-10 ounces) whole milk or butter milk, at room temperature
1/2 cup (4 ounces) cinnamon sugar (6 1/2 tablespoons granulated sugar + 1 1/2 tablespoons ground cinnamon)
Directions:
Cream together the sugar, salt, and butter on medium-high speed. Whip in the egg and lemon zest until smooth. Then add the flour, yeast, and milk. Mix on low speed or stir by hand until it forms a ball. Either switch to the dough hook and increase the speed to medium, mixing approximately 10 minutes, or knead by hand for 12-15 minutes, until the dough is silky and supple, tacky but not sticky. You may have to add a little flour or water while mixing to achieve this texture. The dough should pass the windowpane test and register 77-81 degrees F. Lightly oil a large bowl and transfer the dough to the bowl, rolling it around to coat it with the oil. Cover the bowl with plastic wrap.
Ferment at room temperature for approximately 2 hours, or until the dough doubles in size.
Mist the counter with spray oil and transfer the dough to the counter. Roll out the dough with a rolling pin, lightly dusting the top of the dough with flour to keep it from sticking. Roll into a rectangle about 2/3 inch thick and 14 inches wide by 12 inches long for larger buns, or 18 inches wide by 9 inches long for smaller buns.*** Sprinkle the cinnamon sugar over the surface of the dough and roll the dough up into a cigar-shaped log, creating a cinnamon-sugar spiral as you roll. With the seem side down, cut the dough into 8-12 even pieces about 1 3/4 inches thick for larger puns; or 12-16 pieces each 1 1/4 inch thick for smaller buns.
Proof at room temperature for 75-90 minutes, or until the pieces have grown into one another and have nearly doubled in size. You may also retard the shaped buns in the refrigerator for up to 2 days, pulling the pans out of the refrigerator 3 to 4 hours before baking to allow the dough to proof.
Preheat the oven to 350 with the oven rack in the middle shelf. Bake for 20-30 minutes until golden brown. Cool buns in pan for about 5-7**** minutes, and remove to rack. Frost with cream cheese frosting (see recipe below).*****
*I used an extra-large one
** Instant = Rapid Rise Yeast
***Why ever would you opt for smaller?
****The recipe has you cool them for 10 minutes, but I don't think it is necessary, and, they are better the warmer they are.
*****The Bread Baker's Apprentice has you make a fondant.
Cream Cheese Glaze (from epicurious.com)
Ingredients:
4 ounces of cream cheese, at room temperature
1 cup powdered sugar
1/4 cup unsalted butter, at room temperature
1/2 tsp vanilla extract
(1 tsp of lemon zest*)
Directions:
Combine ingredients in a medium bowl. Using an electric mixer, beat until smooth. Spread evenly over cinnamon rolls.
*While this is not in the original recipe, I think it would taste gorgeous and really liven up an already delicious glaze


