Friday, July 17, 2009

Summer Soup

If there's one thing I can't go without during the summer, it's gazpacho. I'm not too picky about how it's made, as long as it has all of the right ingredients (there's some foreshadowing for you). This means that I don't usually use a recipe. For better or for worse (there's even more foreshadowing for you). I don't always include bread when making gazpacho, but I did this time... I find that it softens the taste a bit, taking away that fierce bite this soup can sometimes have.
As you can see from the picture, the ingredients for this delicious soup are fairly straightforward. (Note: 1 cucumber is usually enough.)


Step 1a: Cut everything up into chunks


Step 1b: Before blending it all together, I like to reserve some chunks to add back into the blended mix at the end, which brings some nice texture to the soup.

Step 2: Blend and add back in reserved chunks (ok, it doesn't look that appetizing, I'll give you that).


Step 3: Add salt, pepper, paprika to taste & plate.


So when I sat down to eat this gazpacho, I decided it wasn't tomato-y enough... so I decided to add a 23-oz can of whole tomatoes (not as good as fresh tomatoes, but it's what I had on hand...).

The gazpacho then turned into this:


At this point I taste the gazpacho. Tomato-flavor? check. But it still seemed to be missing that crisp and fresh summer flavor... "ah well," I told myself, "maybe I just forget what gazpacho is supposed to taste like."

So then I started cleaning up, and what do I find?? The entire cucumber that I had completely forgotten to add!

My friends: cucumbers are the key ingredients to gazpacho. They're what make it "gazpacho" and not "chilled tomato soup."

And indeed, doesn't this look delicious?


Lessons learned:
1. follow recipes (especially when you haven't made the dish in a while)
2. don't forget ingredients

Here's roughly the recipe I used (all ingredients ultimately accounted for); a cross between this epicurious recipe and this Ina Garten recipe.
  • 5-6 tomatoes (i threw in a yellow one for good measure), halved
  • 1/3 pound country-style bread, cut into 1/2-inch pieces (about 2-3 cups)
  • 23-oz can whole tomatoes
  • 1 red bell pepper, seeded, diced
  • 1 whole chopped peeled English hothouse cucumber
  • 1 cup chopped red onion
  • 1/4 cup White wine vinegar
  • 1/4 cup extra-virgin olive oil
  • 3 garlic clove, minced
  • Salt, pepper, and paprika to taste

Thursday, July 2, 2009

The Water Bath

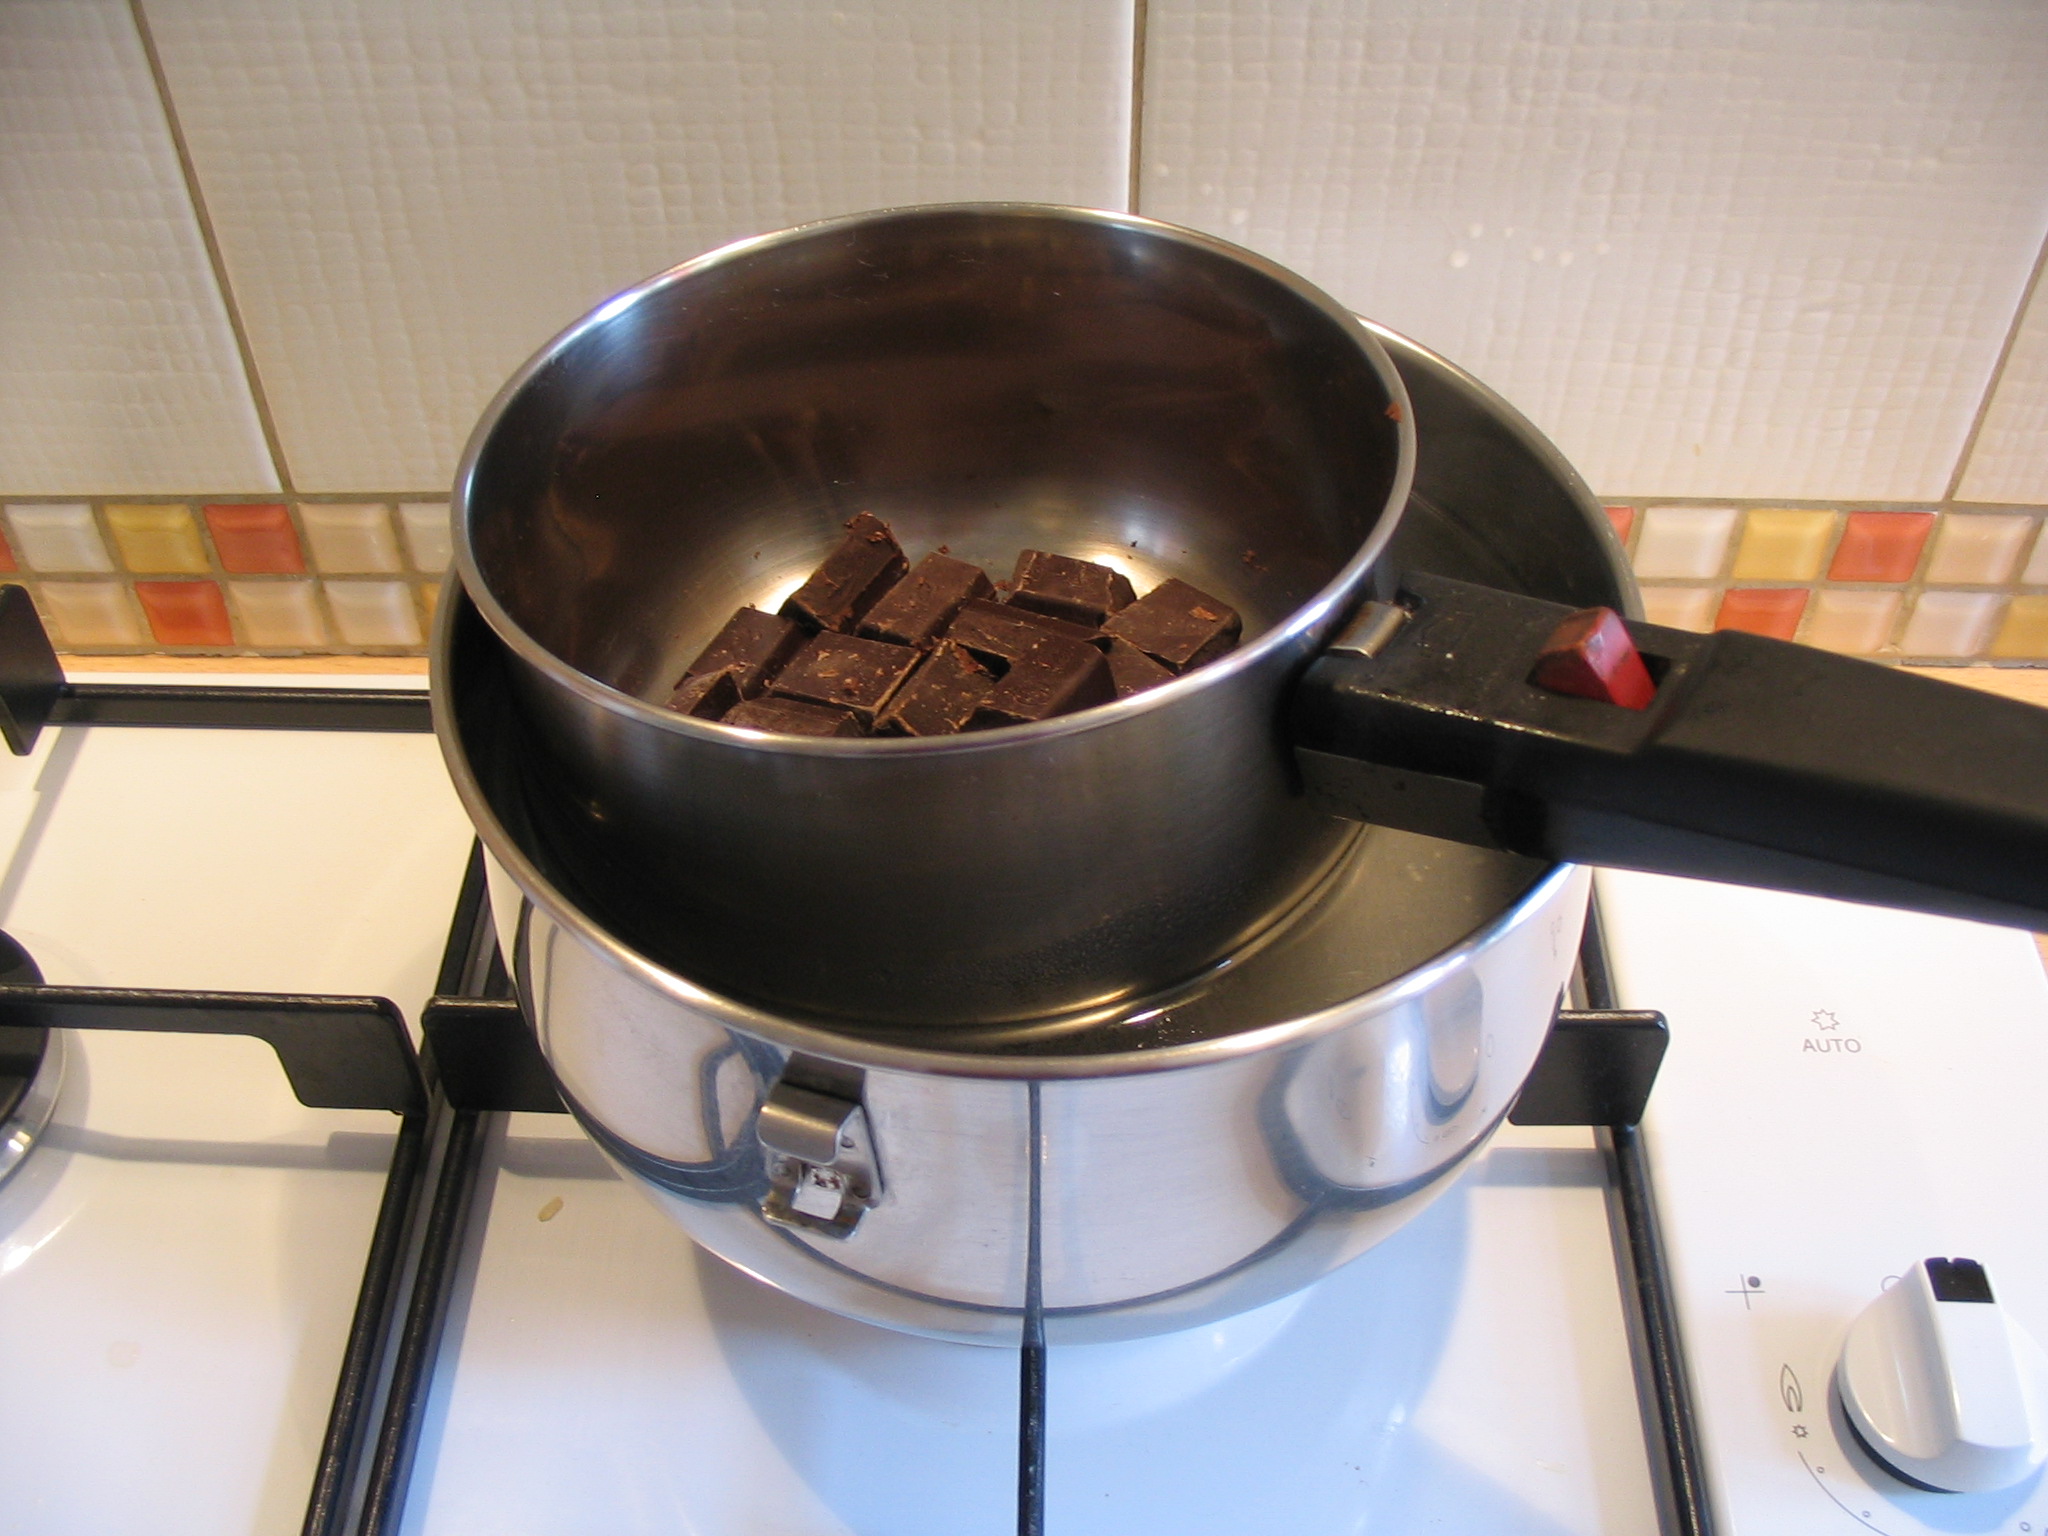
Alright: here's the deal with chocolate. Chocolate is fairly finicky... it overcooks easily, but also cools and changes consistency equally as easily. Pretty much the best method to deal with chocolate is to use a double boiler. Sounds complicated? It isn't.

You don't really need special equipment, just 2 pots, 1 that fits inside the other. The smaller pot will hold the chocolate, the larger one will hold the water. In french, they call this method the "bain-marie" or "water bath." I like that.

So all you have to do is simmer/boil the water, place the smaller pot with chocolate in its bath (the larger pot) and stir constantly until the chocolate is melted. Note: because chocolate can overcook and become grainy, you want to take it off the heat as soon as it has your desired consistency.


Sam: I think you'll find it much more easy to drizzle chocolate when prepared like this! You can also try playing around with adding ingredients to the chocolate that will change the way it cools and tastes. Chocolate sauces (vs. chocolate for dipping) usually have cream or butter added, as well as sugar and some liqueur for flavoring.

Wednesday, July 1, 2009

Temper, temper: Chocolate-Cherry Biscotti

I adore eating biscotti. So much flavor, so much crunch. And so versatile: good for breakfast (dipped in coffee), good for an afternoon pick-me-up (dipped in coffee), good for dessert (dipped in chocolate, then dipped in coffee).

And I adore making biscotti. Biscotti are more time consuming than cookies, but I find the whole process downright theapeutic. So many details to take care of: making the dough, forming the logs, baking the logs, cutting the logs, putting the cookies back in the oven, dipping them in chocolate. When I want to feel accomplished, biscotti are the way to go.

But, I have to admit, I haven't quite mastered the dipping or drizzling with chocolate step. I have tried a couple of methods for tempering chocolate. For the chocolate dipped strawberries, I did a stovetop method. This time, I thought I would try a microwave method. I used about 6 oz of semi-sweet chocolate chips and placed them in a microwave safe bowl. I microwaved the chocolate at 30 second intervals. I ended up doing 3. Dipping the biscotti didn't quite work because there was only enough chocolate in the bowl to cover 1/8 of the biscotti. So I ended up 'painting' the chocolate on with a spatula. This appears to have worked alright. The lesson: if dipping biscotti, make sure the chocolate is deep enough or your bowl wide enough to cover at least half the cookie.

And then for the drizzling. Or should I say the disaster? It seems so easy, right? Dip your fork in the chocolate, then move your fork back and forth over the biscotti as the chocolate drips down. I certainly moved the fork back and forth, but the chocolate would not cooperate. Either it wouldn't flow at all or it would flood onto the biscotti all at once. Emmanuelle, advice? Was the chocolate too warm? Not warm enough?

In the end, there were biscotti covered with chocolate, so I came out ahead. But I realize I haven't quite got the tempering process down.


Cherry Almond Biscotti with Chocolate (adapted from King Arthur Flour The All Purpose Baking Book)
Makes about 60


4 tablespoons unsalted butter
1/4 cup vegetable shortening
3/4 cup sugar
3 eggs
1 tsp vanilla extract
1 tsp almond extract
1 tsp baking powder
3/4 tsp salt
3 cups flour
1 cup lightly toasted, coarsely chopped almonds
3/4 c+ coarsely diced dried cherries (I used 3/4 cup, but thought they could do with a bit more)
6 oz semi-sweet or dark chocolate

Preheat oven to 375.

In a large mixing bowl, cream together the butter, shortening, and sugar. Add eggs one at a time, beating well after each addition. Beat in the vanilla, almond extract, baking powder, and salt. Mix in the flour 1 cup at a time, until you have a cohesive, well-mixed dough. Add the almonds and cherries, mixing until they're distributed throughout the dough.

Transfer the dough to a work surface. Divide it into three fairly equal pieces and shape each piece into a rough 12 inch log [or into two 9-inch logs]. Transfer log to parchment lined baking sheet, leaving about 3 inches between them; you man need two baking sheets.

Bake the logs for 20-25 minutes, until they're beginning to brown around the edges. Remove them from the oven and let them rest for 20 minutes. Lower oven temperature to 300 degrees.


Gently transfer logs to a cutting surface and use a serrated knife to cut them on the diagonal into 1/2 inch wide slices. Because of the nuts and the nature of the dough, the biscotti at this point are prone to crumbling; just be sure to use a slow, gentle sawing motion and accept the fact that some bits and pieces will break off (I love this part of the recipe). Carefully transfer the slices, cut sides up, to a parchment lined baking sheet. You can crowd them together, as they won't expand further; about 1/4 inch breathing room is all that is required.


Return biscotti to oven and baken them for 20 minutes. Remove from oven, quickly turn them over, and bake for an addition 15 minutes, or until they're very dry and beginning to brown. Remove from the oven, cool completely.


Pour chocolate into a microwave safe bowl. Heat for 30 second increments, stirring in between, until chocolate is just melted. (It took me 3 intervals). Then, dip or drizzle tempered chocolate over biscotti. Put biscotti in fridge for 30 minutes to let chocolate set.


Tuesday, June 30, 2009

The Big Easy

Last week, I took a little trip down to the South. Well, I am not sure that southern Louisiana technically qualifies as 'the South'. In fact, I am pretty sure it is its own country entirely. My ancestors, les Allemands, landed in New Orleans in the early 1700s and settled in Bayou des Allemands, south of la Ville (and don't try to be too French, Emmanuelle. It is pronounced 'd-es all-monds', like the nut). My dad grew up near there and last week, I went back to my roots.

And what better way to get in touch with my past than eating authentic Cajun cuisine? Below is a little photo tour of how I ate my way through Louisiana.

Let the good times roll...

It started in New Orleans, where there was of course oysters and crawfish:


(and yes, this is a trough).

And when in New Orleans, there obviously has to be chicory coffee and beignets at Cafe du Monde:


Enjoyed a shrimp po-boy and some Dixie at Oak Alley Plantation:


Then onto the bayou, for fresh caught crab, shrimp, and crawfish:


All in all, one delicious trip...

Friday, June 26, 2009

So easy to be decadent

The night before I went out of town last week, I realized that I had half a carton of strawberries that were going to go to waste if I didn't act fast. Scrambling for desserts, I contemplated sprinkling them over ice cream, but then inspiration struck... Why not dip them in chocolate? So decadent and elegant, yet somehow light and healthy. Chocolate dipped strawberries have to be an almost perfect dessert.


Chocolate Dipped Strawberries
1/2 cup semi-sweet chocolate chips
10 strawberries

Fill a medium sauce pan with 2 inches of water. Bring to a simmer over medium heat. Turn off the heat. Pour the chocolate chips in a heat proof bowl. Place the bowl with the chocolate chips over the water to melt. Stir until smooth and glossy.


After the chocolate has melted, remove from heat. Dip the strawberries into the chocolate, lift and twist, allowing any excess chocolate to fall back into the bowl.


Place on a parchment or wax paper lined baking sheet. Let cool for 30-45 minutes, or until the chocolate hardens.


Wednesday, June 10, 2009

Italian Ice Cream Sundaes

Another graduate student and I often do dinner and a movie. The food is always Italian and the movie is always old. Tonight, I was in charge of dessert, and I wanted to do something that was easy, light, different, and delicious. I have been intrigued at the thought of incorporating a Balsamic syrup into a dessert for some time now, so I thought I would give it a try.

Before I made my reduction, I did quite a bit of research on Balsamic vinegar. What we buy in the grocery store is not 'real' Balsamic vinegar. 'Real' Balsamic vinegar is marked 'traditional' and costs upwards of $60. In lieu of spending a pretty penny on the 'real' thing, you can reduce grocery store Balsamic to create something a bit closer to the liqueur-like consistency and complexity of 'real' Balsamic. While there is no real substitute, I could not be more pleased with my reduction. It took no time at all and my syrup was outstanding: the flavor was rich and complex (my friend said it was "almost like chocolate"), and the texture was like velvet. What better topping for an ice cream Sundae?

Italian Ice Cream Sundaes
Serves 2

1/2 cup Balsamic vinegar
6-8 strawberries
1 tsp sugar (or to taste)
Vanilla Ice Cream
Chopped roasted, salted almonds

In a small sauce pan over medium-low heat, simmer Balsamic vinegar for 9-10 minutes, until the consistency is thick like maple syrup and coats the spoon. The vinegar should reduce to less than 1/4 cup. Let cool.


An hour or two before serving, sprinkle strawberries with sugar, to draw out their juices.

To assemble, scoop ice cream, sprinkle with strawberries and almonds. Drizzle with balsamic syrup.


The Balsamic syrup combined with the sweetness of the strawberries, the saltiness of the almonds, and the creaminess of the ice cream made for a perfect Italian ice cream Sundae.

Saturday, June 6, 2009

Playing like a vegetarian

Recently, in a seminar, someone asked, "Is anyone a vegetarian?" My immediate response was, "I'll play one." To which another grad student replied, "I want to know what the means because my girlfriend plays one too."

So, what did I mean when I said I would play a vegetarian? I have nothing against meat; I find it delicious. But, lately, all I want to do is buy, cook, and eat vegetables. I have eaten salads and other raw vegetables most of my life. But, I must confess, I had no idea how wonderful it would be to cook, roast, and puree vegetables. And, now that I have started, I can't stop. All I want to do is play vegetarian.

Emmanuelle will have to forgive my wonder in the face of this new delicious world, as she has been dedicated to vegetables for as long as I have known her. Hopefully she can extend some of her experience my way.

One way I have decided to play vegetarian is by cooking most of the vegetable recipes out of my Barefoot in Paris cookbook. Tonight: Haricots Verts

French String Beans-- Haricots Verts
Serves 6

1 pound French string beans, both ends removed
Kosher salt
1 red onion, large diced*
1/2 red pepper, large diced (I used a whole red pepper because I had it on hand)
1/2 yellow pepper, large diced (I used a whole yellow pepper because I had it on hand)
Good olive oil
Freshly ground black pepper
Herbs de Provence (my addition)
1 garlic clove (my addition)

Preheat the oven to 425 degrees.

Blanch the haricots verts in a large pot of boiling salted water for 3 minutes (Ina calls for 4, but I like my haricots verts crunchy-er). Drain immediately and immerse in a large bowl of ice water to stop the cooking. When they are cool, drain and set aside.**


Meanwhile, in a large bowl toss the onion and bell peppers together with 2 tablespoons of olive oil and sprinkle generously with salt, pepper, and Herbs de Provence. Place in a single layer on a baking sheet and roast for 15-20 minutes, tossing with a spatula from time to time to be sure the vegetables roast evenly.


Just before serving, reheat the haricots verts in a large saute pan drizzled with a little olive oil and a minced garlic clove. It will take about 5 minutes for the haricots verts to reheat. Sprinkle with salt and pepper and spoon the roasted vegetables over the haricots verts. Serve hot or at room temperature.


And, voila! I thought the colors were absolutely fabulous.


And the taste, oh my, the roasted vegetables compliment the haricots verts ever so well.

*If Emmanuelle has any tips on how you large dice a red onion, I would love to know, as I butchered it.
**I find that blanching vegetables and then sauteeing them is a great way to keep the crunch and give them a lot of flavor.